Fun WEAVES - this is weaving ?? !!
Try it!!

Have you ever ...
woven things with objects nobody can imagine using?
Try this one!
SECOND IDEA --------
You need:
-*-*- 7 drinking straws (soda straws)
-*-*- some embroidery or knitting yarn, not (too) fluffy nor stretchy (as the warp)
-*-*- lots of colourful odd yarns and wools to weave with (as your weft)
-*-*- scissors, a long embroidery needle, maybe some sticky tape ("sellotape")
-*-*- patience
Maybe you need to look at the wordlist to help you remember what the technical words mean? Or maybe
you will find it best to look at the first and second weaving lessons to have a good explanation
of these words?
STEP 1 :::::: Preparation: Cut your cotton. To get the right length for learning, measure the
length of your arm from shoulder to the longest finger, add to this the length of your hand from wrist
to longest finger.
STEP 2 :::::: Cut 6 more lengths like this. Thread each length into your needle, then pass the needle
through a straw. Maybe you need to shake the straw so that the neede and yarn will slip through
the straw more easily. Pull the cotton through until there is as much hanging out at the top of the
straw as it is long. Prepare your 7 straws like this.
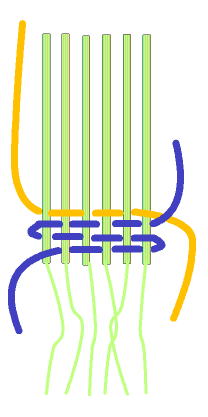
STEP 3 :::::: Put the straws side by side. Make sure the short ends of the warp threads
at the 'top' of the straws are all the same length.
STEP 4 :::::: Get your first colour of knitting wool ready to use.
|
Take the straws in your hand, hold them flat. The short ends are at the top, the long
"tails" are hanging down near you.
If you think that holding the straws straight and closely together,
and at the same time pressing the knotted shorter ends of weft yarn ends against the straws,
then stick each warp thread to its straw as near as you can to the base, close to the knot.
You will need to take this sticky tape off soon!
|
 |
|
Tie all 7 short ends of the warp thread in a knot, it as close to the straws as you can.
|
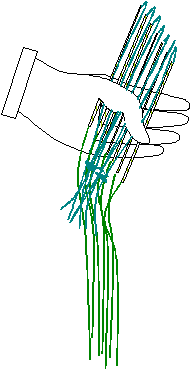 |
Pass a thread of coloured wool across the first straw along the front. Then between that one
and the second straw to the back. Take it along the back to the third straw, and pull it out
towards you through the gap between the second and third straw.
Across the 3rd straw
at the front, then through the gap between the 3rd and the 4th straw to the back.
Continue to weave to the end.
|
|
| this is how weaving your first row will look like :
|
 |
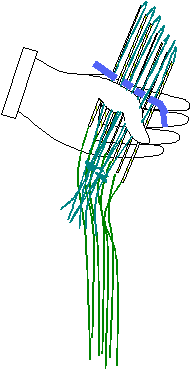
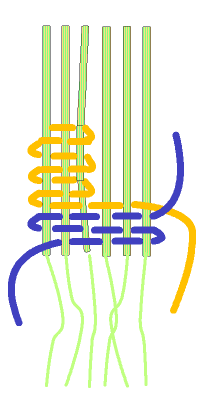
| At the end you turn right round the last straw, it is straw number 7. The row finishes
across the front of straw 7. Now you take your wool round it and to the back. Pass the wool
under the 7th straw, then between straws 7 and 6 to the front, across the front of straw 6,
towards the back through the gap between straws 6 and 5. Continue weaving to the end.
Turn. You are doing fine. Just continue
|
|
|
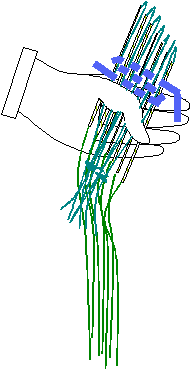
You turn at the end of each row. Make sure you wind the wool round that last straw
every time!
|
 |
|
... and here the animation of those first few rows of pin weaving :
|

|
|
When your weaving covers about half of the straws you may have run out of spare warp yarn
by the knot. You need more warp yarn, you have a good length of it hanging down from through the
straws. Carefully and slowly pull some more length of the spare warp up through the straws.
Pull each thread to the same length. If you have used sticky tape to hold the warp to the
straws, you now have to take off the tape. Slide your woven length downwards slowly and
carefully towards the knot.
|
Continue weaving until you have used about half of all the length of warp you had measured!
|
Look at your work: it is very loose, there are gaps between the rows you wove. This is quite
normal because you cannot push the rows together too much while they are on the straws.
If you want to use what you are weaving you need to make it more solid.
It gets a bit
complicated now, maybe you need someone to help you the first few times you do this :
you need to push your weave together. Hold the warp threads where they come out of the tops of
the straws, press them firmly against the straws. Now push your woven rows downwards
towards the knot.
|
You see that you have quite a lot of warp thread without any weft yarn, between the
base of the straws and the top row of your weave. The rows are closer together, and your work
feels much tighter and firmer.
|
|
Continue weaving, and pushing your woven rows together, until the very ends of your weft yarn
is almost disappearing inside the straws.
|
Pull the last length of your warp yarn out of the straws, push the last woven rows
downwards .... and tie a knot close to the last row of your weaving.
|
|
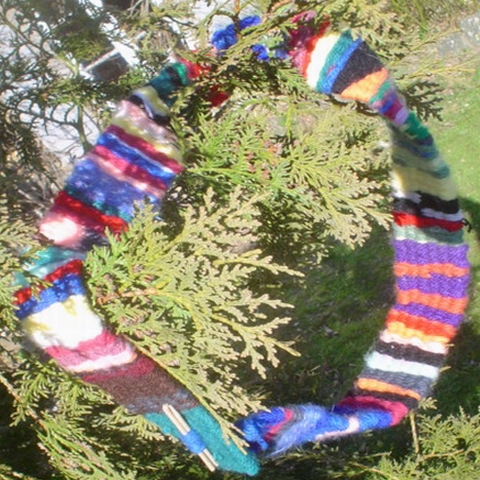
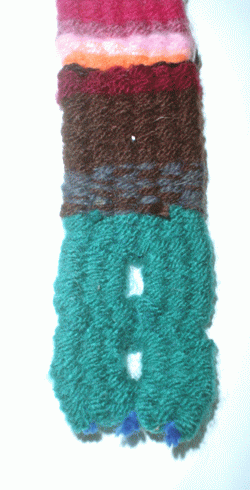
Here is a photo of a colourful stripey belt. It has a "button" of tooth picks which I
shortened and sanded to have smooth edges. |
|
| Like all buttons this one has a buttonhole where it passes through! |
| Now you are going to find out how to make the stripes and the buttonhole. |
The buttonhole is not difficult, but you have to look carefully!
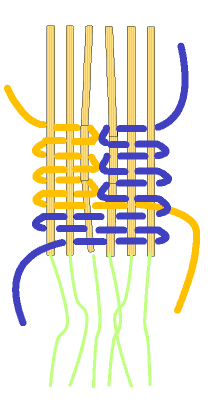
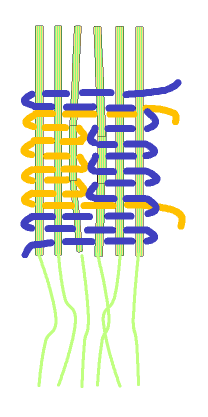
To show you exactly how to do this, I use 2 different colours in my drawing.
Colour 1, the blue, is the colour I used all along the band I wove already. Colour 2,
the yellow, is the new colour I use to show you where the wool has to go.
To make it
easier to see where to place the yarn and how to weave, my drawing shows you just 6 weaving
sticks. But you can weave buttonholes on any number of weaving sticks. You can try to weave on 4 sticks
and have the buttonhole in the center, but this will be a rather narrow braid and I did not
like the flimsy look of my trial 4-stick-braid; to have something useable I suggest you try weaving
on at least 6 pins. For a tidy look of a central buttonhole use pins in even numbers (6, 8, 10, etc).
|
|
After your first colour, end on the right edge, leave your wool hanging.
On the same edge start weaving with colour 2.
Follow exactly the 'over-under'
rythm that your first colour should have made!
|
 |
At the end of that row, turn and start going back.
BUT you only weave around 3 straws!
You wind the yarn around the third 3 straw and turn to go back to the left.
Do you see that
you only weave on half of all the weaving sticks you hold in your hand?!
Weave 7 rows using these 3 weaving sticks, that is half the width of what you have used when
you wove with colour 1.
You will end that last row on the left. Leave your colour 2 hanging.
|
|
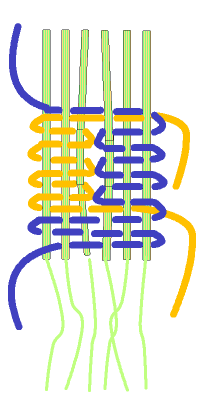
Take your colour 1 which is still hanging on the right.
Start weaving with it.
Weave around just the 3 straws, towards the center. Then go back to the right edge.
Continue weaving, you need 7 rows. You end on the right.
|
|
Then you take your colour 2 again.
Weave across all 6 straws to the right.
Leave colour 2 hanging there. Pick up your colour 1, and weave with it across. It takes exactly
the same path as colour 2 did.
|
|
| Turn with colour 1, go back.
You have finished a woven buttonhole!
|
|
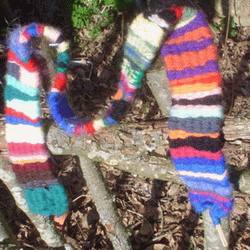
Here you can see that I have 2 buttonholes.
You will understand why I needed them
when you read the ideas page. |
 |
| To weave stripes you start as you did for the buttonhole:
you stop colour 1 on the right, leave the wool hanging. Start weaving with colour 2
from the right.
With colour 2 you weave straight across all the straws. Weave as high as you want.
Now you must cut the first colour: leave a tail as long as the width of your 6 straws!
Then you can start weaving with colour 3 to follow your colour 2, or maybe you want to
weave with colour 1 again?
Remember: you do not cut the wool you are weaving with. Always cut the wool that you used
earlier. This will help you to look carefully at what you have woven, it is quite easy to
cut all the wool.
|
normal stripes
This looks like a buttonhole in a stripe, but it isn't! To do this you weave across 3 straws
from each edge, then you 'twist' the 2 colours in the centre before you go back with
each colour to its side. You weave "stripes" in which you have beautiful even 2-colour halves !
|
You are 'pulling' on the wool when you weave with it. When you stop weaving, the wool
will rest and contract, it will pull itself together a little. Rows will become shorter, tall
stripes will be less tall, ends that hang down will be shorter, too.
If you were to cut
the ends of your yarn just after you wove with it, you would find that after a few minutes the ends
would no longer hang down on the outer edge but be pulled into the weave.
If you leave them
there your weave will get very loose and will after some time 'fall apart'.
To make sure you have a good weave, and enough wool for tidying the ends, you must cut
the wool of one colour only when you have finished weaving with the following
colour.
|
Do experiment with changing colours in the middle of the row. How do you get an arrowhead
shape into a row? Or a diagonal line? Try to use 2 colours together...
|
| Finally you must tidy up the band, all those loose ends must go. WAIT !!
If you cut them off your band will quickly fall apart.
Thread each tail into your
embroidery needle ... |
then you 'weave' it along the edge, upwards or downwards into the rows.
Only then can you cut the remaining short tails off. |
|
Do you want to chose another fun weave?
Back to the weaver's shed?
|