To weave you need a loom ...
... well, it helps.
Here I'll tell you about some of the different names and looms people buy,
and I'll try to explain what they are good at weaving.
There are looms you can move, and looms so heavy that this would be impractical.
There are looms so small that you can carry them in a bag
and looms so large and heavy that this would not be very easy or sensible.
There are looms that are upright and tall, and looms which are low and long.
There are looms with levers and pedals, and looms which look like a frame.
There a looms which are round and looms which are angular.
And there are wide and narrow looms, long and short looms,
looms you can fold up to save space and looms which stay open all the time.
There are looms you can buy and looms you can make.
The names of looms
Sometimes the name describes what the loom is used for.
* A rug loom is made for weaving rugs.
* A beading loom is made for weaving with beads.
* A pot-holder loom is one on which you weave squares to make into pot-holders.
* A tapestry loom makes weaving a tapestry easier.
Sometimes it describes where or how it is used.
~ A table loom stands on a table.
~ A floor loom stands on the floor.
~ A lap loom is used on the lap.
~ A school loom - yes, it's used in schools to teach weaving.
~ An upright loom stands upright (can be leaning against a wall), it is also called a vertical
loom because the warp is going from the top to the floor.
~ A horizontal loom is one where the warp threads are running on a horizontal ("flat") line
between the front and the back.
~ A travel loom is made not for weaving while you travel but to allow you to take it to
different places (that means it's not too heavy nor too large).
~ A handloom indicates that the weaving is done by hand - - as opposed to the industrial looms
where motors are used to move the weft, wind warp or cloth, move shafts.
Sometimes the name describes a special aspect of the loom.
^ A jack loom has 'jacks' to push the heddles; they all seem to have the back roller
on an 'arm' to be folded away when not in use.
^ A backstrap loom is held in place by a strap that passes round the back of a person.
^ A stick-loom is not really a loom, but you use a set of sticks for weaving on.
^ An inkle loom has inkles around which the warp threads run.
^ A tri-loom is triangular to weave triangles. And on a circular loom you weave circular items.
Sometimes it describes the way in which a mechanism moves the threads to make the shed.
» A countermarch loom lifts one set of warp threads upwards while at the same time pulling downwards
the other set of warp threads. To do this it has a large bridge-type structure above where pulleys
for lifting and lowering are housed, a 'counterbalance loom' is another name for it.
» A rigid heddle loom has a 'comb' called a rigid heddle to make the shed, there
are slots and slats with holes where the warp passes through.
There are no special names for looms that use treadles (pedals) or levers to move the sets of
warp threads.
So - - what about this mechanism to lift the warp threads?
Weaving means placing threads over and under each other and keeping them in place
(the weaver calls this "binding the threads"). You need to make sure your threads do just that,
they are 'bound' into each other.
The easiest method is to make an individual shed every time you want to pass the weft under a warp
thread, by lifting each thread with your finger, which allows the weft to pass underneath it.
This method is used on the basic weaving frames. If you weave just a few small things, and you weave
only a few things every year or month, then you probably won't tire yourself too much if you have to
work like this. But if you weave more items, or you weave more often, or you weave long items,
or you have a physical problem, then it might be useful to have something that makes it easier
to lift the warps.
 |
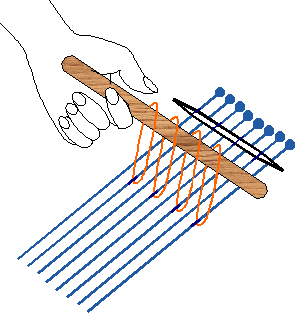
This is why a leash stick is useful. Instead of your finger lifting each warp thread,
you have a loop of yarn lifting the thread for you. This loop of yarn hangs off a stick. As
you want to make lifting the warp faster you have lots of these loops to lift lots of warp
threads all at the same time: you put a loop on every second warp thread. |
Here is the leash stick lifting the even-numbered warp
 |
at the right: ----------->
see how you lift half of all the warp threads
(I coloured them yellow)
away from the other half,
to allow the shuttle to pass through the shed. |
As this helps with just one
direction of weaving, you use a
shed stick to lift the
other set of warp threads (I coloured them blue).
 This animation shows that the leash stick lifts one set of warp, then you put it down and pick
up the shed stick to lift up the other set.
|
This method can be used on small frames and looms.
People in the stone age used this method.
The "school looms" have a clever mechanism to move the warp threads, having some above and
those below the shuttle. A thick stick with notches carries the warp threads,
one thread in a notch. The notches are on two sides of the stick, on the one side the notches
start with a deep one first next to a shallow one and so on, on the other side the first notch is a
shallow one folloed by a deep one and so on. When you turn the stick you lift the warp into a
shallow notch at the top, or lower it into a deep notch. This allows to have some warp threads
higher while the others are lower. The difference between the two heights give you the shed.
The shed is very small and if you knock the frame or the warps, they will slip out of the notches.
But it shows that making the shed can be done by moving one lot of warp threads higher while
taking the other lot of warp threads lower at the same time. And if you work carefully and take
your time, you can weave some good-looking work on these !
This idea of "lifting higher - keeping lower" is put into very good practice in the following system.
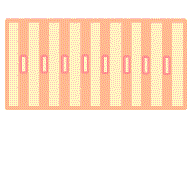
You see it on the rigid heddle. This is like a large comb in a frame.
| Each 'tooth' (it is called 'slat') has a hole in the center, halfway
between the top and bottom of the comb. |
 |
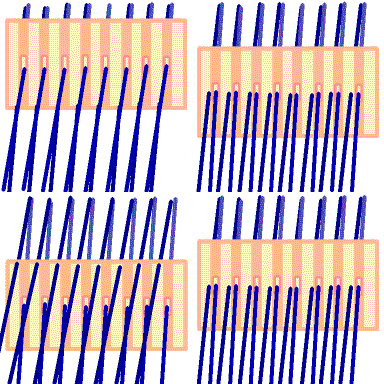
on a loom it looks like this |
 |
and it moves the warp threads like this |

|
When you warp up you pass a thread through a gap and the next thread through a hole, and so
on. Lift your comb and you see that half of all your warp threads are lifted, the other half
stays down held in the gaps. Then push the comb down and all the threads in the holes go down
past the threads in the gaps. The teeth are at a set distance to each other, when they are
wide apart you can pass thick yarn or string between them, if they are close together only
thin yarns can pass easily.
Another way of making the shed is done by tablets also called cards. They are square
cards which you can cut from a solid cereal box, make them 10cm/4" square. Punch a hole near
each corner and give them the numbers 1 to 4. Thread the warp colour number 1 through hole
number 1, in each card. Then colour number 2 through hole number 2. Do the same for numbers
3 and 4. Now tie the far end of your warp threads to something solid, and hold the near
ends tight.
Notice that there is a large gap between the warp threads coming from the top holes and
those coming from the bottom holes. This gap is the shed where you pass the shuttle. When you turn
the cards you see that you lift or lower the threads.
The last way of making a shed is by using special frames called "shafts" which hold objects
that almost look like a double-ended needle as it has a hole in the middle.
A bit like the teeth of a rigid heddle.
In fact, it is works like a rigid heddle: you pass some of warp threads through the 'eyes',
and other warp threads run in the gaps between these 'needles'.
They are however not called 'needles' even if some of them look a bit like it. These items are
called "heddles". You can have metal heddles or heddles made from thread.
The nice thing about heddles is that they are put on a rod, so that you
can move them closer together if you want to weave on fine warp thread or have a tight weave,
or put them further apart if you use a thick warp thread or want loose fabric. On a rigid
heddle you cannot change too much what type of yarn you use unless you really want a special
effect.
Looms with shafts always have at least 2 shafts, and some professional ones have 12, 18 or more.
These shafts sit one behind the other, and usually you don't put alternate warps through the
eyes of the heddles in each shaft. To see how this is done, the patterns you can weave,
you need to get a book from the library.
When you warp through a shaft, you pass the warp thread through the eye of the heddle. Each warp
thread passes through one eye, and when it has to go through the other shaft it has to
pass (just like on the rigid heddle) in the gap between two eyes.
The back shaft holds all the "even number" threads in the eyes, the front shaft has all the
"uneven number" threads. To weave the simple "over-under-over-under" type of binding you just
lift first the back shaft, pass the shuttle, then lift the front shaft and pass the shuttle.
..:´°`:.. ..:´°`:.. ..:´°`:.. ..:´°`:.. ..:´°`:.. ..:´°`:..
..:´°`:.. ..:´°`:.. ..:´°`:..
To the weaver's shed

Go back to the previous page

|