::x::x::x::x::x::x::x::x::x::x::x::x::x::x::x:: BRAIDS - how to make some,
and the special looms
Inkle weaving ::x::x::x::x::x::x::x::x::x::x::x::x::x::x::x::
| Braids are narrow woven bands, usually with a pattern. |
|
You know that weaving looms can make long lengths of braid because
they can hold a long warp, and that weavers would weave braids on them.
But weavers often prefer using a narrow loom for braid weaving, it is easier to warp up. |
|
The oldest idea, used in the bronze age already,
is having the warp as long as was needed for the fabric, and weaving a decorative pattern all
along this length.
|
T
a
b
l
e
t
s |
In that time people wove fabrics with an extra nice edge
which was the decorative border.They probably did not weave bands to sew onto the clothes.
All the necessary warps were on the loom but the border was woven
with some special bits added in: the weaver used tablets on the warp.
I'll explain that on the next page. |
|
|
?? |
There are two looms which are very well known for weaving braids :
| 1 ... The inkle loom |
|
2 ... The tablet loom |
|
1 ... the inkle loom
why it has such a strange name I do not know. But then, it is a strange loom, and when I first
saw one I did not understand how anyone could weave on that : I saw no rigid heddle, no shafts.
But I soon learned!
You remember that for weaving a good length you need somewhere to keep the warp
and somewhere to keep the finished work. The inkle loom has a clever way of doing this.
If I tell you that all the warp threads are tied together, you can imagine that this will look like
a belt. After weaving you cut the unwoven ends and lay the braid flat. You will be surprised that is
quite long although the inkle loom is rather small.
Where you store the warp and the woven band? Look at the long round "pegs" (sometimes called "pins") sticking out from
the side !
You wind your warp around these, a bit like you had to do when you warped your weaving frame:
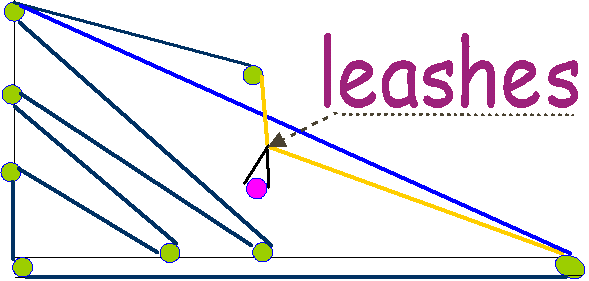 you lay your warp in a 'zig-zag' path round as many pegs as you want. The more pegs you use
the more warp you need, the longer your braid will be. The word "leash" on my design here, sits
where the leashes are put on an inkle loom. Did you look at the rigid heddle design on this site?
The leash does what the 'eye' in the slat does: it holds some of the warp threads so that the others
can move up or down to make the shed.
And just like the eyes in the rigid heddle, the leashes
on an inkle loom hold every other warp thread.
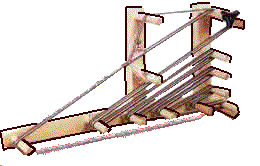
Here is the picture of the inkle loom from the weaver's shed, warped up to start weaving.
AND NOW ... a quick lesson on how to prepare and weave on an inkle loom !
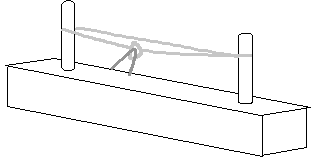 |
First you need leashes to hold the alternate warp threads. You need a "jig" so that all the leashes are the same.
Here I show you a block with 2 long rods fixed firmly. The distance between pegs is the length from leashing-peg to where
you want to hold the warp on your loom,and then back to the leashing peg. Use fine smooth
cotton to make the leashes; use cotton that does not stretch if you can find it. |
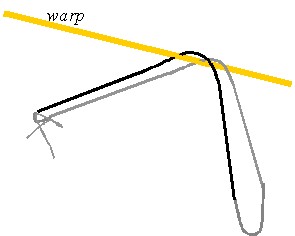 |
Put the cotton round 2 pegs, pull as tight as you can. To have the same length for all leashes you have to pull all leashes as tight as the first one!
Knot the leash, cut the ends short. Slide the leash off the pegs ...
Fold the loop of your leash in half, place the fold on the warp |
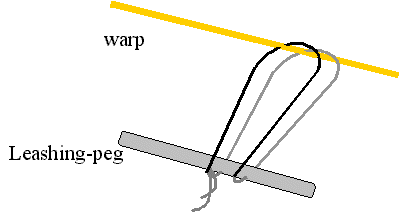 |
Pull the warp downwards using the leash, slip the two closed ends of the leash over the
leashing peg |
I show you how I prepare my home-made inkle loom for weaving. The loom looks
different from those you can buy : it is made from a wooden bed-head, which is why
it has 'square' pegs instead of round ones
(I did say somewhere that I recycle many things, and I did round off the corners
of the wood ...)
|
 |
To start warping-up you tie the yarn to a loom-peg or a pin
(like I have on my loom, see photo), later you will tie it to the end of the yarn.
I have tied mine to one of the 2 pins you see on the loom, I do not have a separate jig for making
my leashes but have the pegs on the loom. Should I need to replace a broken leash I can make one
very easily as I have the right measurement to fit the distances on my loom.
The leash for an inkle loom is just a small circle of firm yarn, ends tied firmly. To have
them all the same length I tie them around the 2 pins which are my "jig" (see on the 6th photo down,
the one where I explain about the weft passing).
You have to get used to warping-up evenly, to weaving, and to discover your own way of
pulling the warp, keeping the tension, and beating down the weft.
|

|
I want to have 2 colours in my braid. I measure the length of the first
colour thread and cut 6 more of colour 1, then I cut 6 of colour 2 but about
2cm/1" longer. I knot them together, one colour after the other. I knot them so that the knots all sit
on the largest peg at the front of the loom. Some threads might have a very long 'tail' because
it is easy to make an error when measuring the lengths: I cut these 'tails' short.
|

|
I start and finish the warp with the same colour on the edges because it
gives a tidy look to the braid.
All the yellow threads run over the top peg. They are held in place by the
leashes which are looped over the leashing-peg just below it.
Have another good look: you see that the 2 colours sit together on the pegs; they are divided into the blue layer
coming from the top left peg going to the bottom far right peg where I started knotting the colours together.
The yellow warp threads are pulled downwards by the leashes. The distance between the two layers of threads is the
natural shed, that is the one always there when you don't move the warp.
|


|
You can see that the weft will pass easily between the blue and yellow warps.
To show you the natural shed even better I am pushing the blue thread up further than it would be on its own.
You can push the top warps up a bit to have a larger shed for your shuttle.
For the 'return' pass of the shuttle, you have to push the blue yarn
past the yellow to make the shed.
|


|
The weft passes...first in the natural shed: that is the one always there
without having to do anything (because the one set of warp threads are held by the
leashes below the other set). Note all the blue warp threads at the top.
Then push the blue warp threads down so that the yellow warp is at the top, and pass
your shuttle back. See how the weft thread gets trapped between the two different
layers of warp! Moving the two layers of warp thread traps the weft in place.
Have another very good look at this photo: because your warp has not yet been fixed by the weft,
you won't get a neat start to your weave. Read on to find out how to get that neat start.
|


|
Three final points:
First - - - when you start weaving the first few rows will be uneven. This is because
the threads are still loose from warping-up and because you do not have the "feel" for
the threads and your muscles are unused to this work.
To avoid losing any good weft
thread, just weave a few rows with some waste yarn. You'll undo this later.
(you do this for any weaving that has to have a tidy neat start!)
After a few minutes you will find the speed of moving your hands that suits you,
you will learn to observe how the weft lies at the edges and discover how hard to pull
the weft into the warp at the edges, you will begin to beat down the weft always with
the same force.
All this will give you an even edge and an evenly woven braid.
Note that on the inkle loom
1.) the colours of
the braid are those of the warp!!!
2.)The colour of the weft thread is only seen on
the outside where it passes round the edge warp thread.
3.)You can feel a texture on
the surface, if you use thick weft yarn.
To discover the effects you can create with yarn try to experiment with different thicknesses of warp
and weft yarn.
Second - - - What do you do when there is not enough space to pass the shuttle, between
the finished woven rows and the leashes?
You pull very gently, the finished work towards the big peg at the front of the loom. This will make
all the warp threads slide round the other pegs. Then you can go on weaving.
On inkle looms you buy the manufacturer has put the end peg on a nut-and-bolt set inside a groove or slot:
this takes the tension out of the warp when you slide the peg along, and makes it much easier to pull
the whole warp and woven braid along all those pegs on the loom. Now you know why you need smooth
cotton for the leashes: the warp threads have to slide smoothly and easily through the loops of the leashes,
if they rub against rough cotton, they might be 'shredded' or weakened and snap later, or they might stretch too much.
Third - - - When you have no more warp to weave easily, slide the band of woven braid
and all the leashes, off all the pegs. Cut each warp thread on the knot (or in the center
between the beginning and the end of the braid).
Undo the first few rows of weaving if they are no good. Then finish the open ends: tie a knot at each end
using all the warp threads. Or: plat the threads and knot the end of each plat.
Or: with a needle, weave each warp thread back into the braid.
This will give you a straight edge.
|


|
|