::x::x::x::x::x::x::x::x::x::x::x::x::x::x::x::BRAIDS - how to make some,
and the looms to help you
Tablet weaving::x::x::x::x::x::x::x::x::x::x::x::x::x::x::x::
There are many very good sites on the internet where you can read all about weaving
with "tablets" (or "cards" as they are sometimes called). It seems to be the favourite technique
for producing decorative braids for people involved in historical re-inactment.
I have
two links to good sites in my list, you can see the beautiful colour patterns people weave. I
also have a link to a site where you can read about the braid weaving thousands of years ago.
So I will just explain the basic setting-up, to give you an idea of how to do it.
It is quite easy to do, and the basic pattern is woven quite quickly, but you need to concentrate
on what you are doing.
Like any good weaver you will then experiment with different types of yarn, with different
thicknesses of yarn, and you will write down exactly what you used and what you did.
As always, weavers will write down what yarn they used, which colour went through which hole,
wheather it came from the pretty outside through to the 'white' inside or not, and wheather they
turn each card right round or only turn twice forwards before turning twice backwards.
Weavers have a system of "drawing" this information. This is important because
you might want to do a good pattern again, and want to avoid redoing a bad one.
There are a lot of sites on the internet where you can learn more about this if
you are interested. I think that my site should just make you interested in weaving,
show that you can do it successfully, and help you understand some of the things that happen.
If after a few weeks or months you feel that weaving is a good hobby for you, your hands and
mind have got used to it, and you are happy doing it, then you might want to look for the more
technical information on the internet, in books from the library, in textile museums or indeed
learn more and meet people of all ages in weaving courses.
| Tablets are made of smooth card, square, with rounded corners. In each corner
not too close to the edge, is a hole where you thread the warp yarn through.
You can make very good tablets from playing cards, just cut them square. But you
can also usesolid cereal cartons.
I have drawn the diagonal lines to find the place for making the holes because they
have to be exactly in the corners (not just anywhere along the edge!). Number the holes,
on the inside with the numbers or figures printed, it is usually white so you can see
the numbers of your holes better.
|
|
Each card has 4 warp threads. Make the warp as long as you need for a belt and add
half as much again (because you can't weave right to the ends of the warp).
Make sure you thread the warp from the patterned outside of the card through to the
numbered side.
Prepare 16 cards for a narrow braid.
|
|
Prepare your weft thread, use a wooden shuttle or make one from very firm thick
card. It needs to be firm because you will use it to 'beat down' the weft with
the edge of it.
There are special shuttles for this but it is not necessary to
have one, a normal flat shuttle and your careful attention will work fine (you see that
a weaver needs to concentrate all the time). If you do, then why not make a few different
ones to see which size works best for you.
Here is what it looks like. It allows you to get really close to the last
row of weaving without rubbing the thickness of the weft against the warp when you beat down,
or even trapping the layers of weft on the shuttle between the tightly-stretched top
and bottom warps (that makes it tiring to weave).
You beat using the edge with the large distance to the weft.
|
|
Put the cards on top of each other, all with the decorative printed 'outside'
downwards. Take all the threads coming from holes 2 and 3, and tie them as a bunch to
the back of a chair or door knob/handle or similar. It should be an object that doesn't move about.
Tie the threads from holes 1 and 4 to a chair back, or hold in your hand.
Traditionally and
historically, you tie the ends by you, to a stick, and this stick gets tied to your belt
(so you can get out easily when you stop weaving). To put tension on the warp, you have
to lean backwards, away from the end you tied to the door knob/hande or chair back.
You can tie them to another chairback and sit on the chair when you weave, this
will allow you to loosen the tension while weaving along (you remember I explained about
'shrinkage' in the basic weaving lessons .....).
Note that on this drawing the weaver uses a normal shuttle, not the special one.
|
|
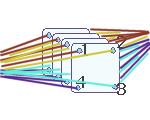
Look at the pack of cards from the side. See the gap between the threads
from hole 1 and 4? And the gap between the threads coming through holes 2 and 3?
You will be weaving using the gap of the warp threads that are in front of you.
To do this sit in front of the pack of cards with the numbers 1 and 4 towards you.
In the drawing above you can see the shuttle passing in the shed between the
warp threads of hole 1 and those of hole 4.On my drawing:
the warp in hole 1 is brown, in hole 2 it is curry, in hole 3 it is turquoise,
in hole 4 it is blue.
You have 2 colours on the top (brown and curry)
and 2 on the bottom (turquoise and blue).
You are sitting looking at holes 1 (brown) and 4(blue).
|
|
There is some more preparation before you can weave. Please have a look at weaving
lesson 3 to see how to weave waste rows before you begin the real pattern using your chosen
weft for your work.
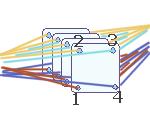
When you have passed the shuttle, beat down the weft.
Then
you will have to turn ALL the cards, ALL in the same direction, just one turn towards you
(you are now sitting in front of the cards looking at holes 1 and 2).
Look where the colours are:
at the top you have curry and turquoise, at the bottom are blue and brown.
You have to beat down the last row of weaving into the warp, it is already 'trapped'
because you turned the cards which binds the last row. You may have to beat down
twice to get the last row lying next to the previous one.
Then you pass the shuttle through the new shed.
|
|
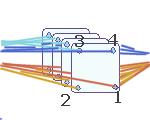
| Now turn all the cards again towards you. You have hole 2 with the
curry thread and hole 3 with the turqoise thread towards you. At the back are
hole 4 with blue and hole 1 with brown warp thread. Remember
to beat down the row before you pass the shuttle again.
|
|
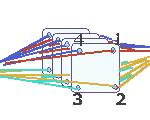
| One last turn towards you, to bring the blue of hole 4 towards you at the
top and lower hole 3 with the turquoise in front of you. Beat the weft in place,
and pass the shuttle through the shed.
|
|
| And now you have to turn all the cards in the opposite sense and weave a row
every time before turning the cards. Until you get to the StartPosition, which was
the brown at the top and the blue at the bottom, in front of you, and at the back
you had curry and turquoise.
|
Do this turning towards you and then back, several times. See what the pattern
looks like. Then try the 3 turns forwards, 3 back to Start, 3 more back, then 3
forward to Start. Do this a few times.
|
| Then try to weave with a very thick weft thread. And try to weave without
beating the weft into place too tightly: what difference to the colours you see
on the surface?? And what happens when you pull the warp less firmly??
|
Just experiment. And remember to note it all down, what you have done and how
the braid looked, and also how it felt to the touch when you untied it!
|
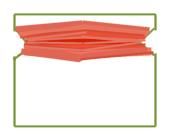
Here is a loom Guido made (thanks for permission to show the photo).
It folds up so he can take it to fairs and shows, he is in a historical reinactment group.
With a loom he does not have to hope for a doorknob or chair back to weave well. On his website you can see very beautiful braids.
This loom, and the two looms below, allow you to
* work anywhere as they are light
to carry
*will take as much warp as you want, if you make the loom to the size you want
|
|

|
some braids woven by Flinkhand (thanks for permission to show them) |
|
|
 another home-made tablet loom
|
and here is Flinkhand's inkle loom used as a tablet loom.

note how wide the pack of cards with warp threads is, and how narrow the woven braid!
|
When you weave with tablets (cards) you see the WARP threads on
the surfaces, they give you the patterning on the braid!
Just like they do in inkle weaving.
|