Welcome!

You want to weave ?
You need a "loom" !
If you don't have a loom don't be sad, don't give up, don't complain,
get some help and Make Your Own !!! This is where all the fun starts...
Start with one of those I show here, you can show everybody that you are a great artist. These looms are fun because you can weave with things on them that you would not
be allowed to use on an expensive loom ! !
Don't try to get a "real big loom" or a table loom straight away, they are very expensive -
what if you just
don't like the look and feel of weaving ?!
Try to weave on the smaller frames and looms instead, or on one of these weaving object I'll describe on this page
learn the basics which will help you experiment and discover and learn more about what can be woven.
And see what great things you can make.
Get used to some of the special words weavers use.
You have to learn how to sit (or stand) to work without tiring your back and arms.
That will take time,
only you know what is best for you.
You train your hands and muscles, your eyes, your memory and your patience - so that you can
to weave some serious stuff to be proud of!!!
Here are some "looms" you can make.........
... a branch or a tree Nature-Loom
"RecycLooms" : use throw-away objects as a loom
make a frame loomfrom lengths of wood
and finally try to make shaped card looms
Some are like looms you can buy, some came out of my imagination,
some are looms I have seen but have changed a bit, some look a little strange.
Whatever they look like : have a go at weaving. You'll be weaving something GREAT !
~.°.~°~.°.~°~.°.~ The Nature Looms ~.°.~°~.°.~°~.°.~
create a work of art !
You use branches to make them. There are two sorts to try.
One which you can make and use indoors,
one you work on outdoors, and you can leave there as a winter decoration if you use the right
things to weave with !
´i`v´i`v´i`v´i`Number one Nature loom´i`v´i`v´i`v´i`
When out walking look for broken branches. Maybe you have a garden where you can take
a branch, or a gardener in your area can save a branch for you.
Take a branch which has a good thick stem with two good shoots
of wooden growth coming off in a "V": either the branch ends in a "fork" of two shoots at
the top, or it has two good shoots coming out like a "V" at the same side.
If the branch and shoots have too many leaves take them off for your first weave creation.
This will make it easier to see what you are doing
Whatever you weave on this branch has to stay on it, you can't take your work off to show
to people as this would damage the branch or your work. So look for a nice branch that's not
damaged by the weather or animals. You can keep it for a while; if it is not too
large you can carry it to show to people.
NOTE ~~ ~~ ~~ if you want to show this branch indoors
you must clean it, especially if it is covered in dust or mud.
Scrub it with a hard brush to take off all the loose bark,
make sure no ants or beetles
etc. are hiding anywhere.
If you want to keep the branch for a while it should be varnished.
::::::: The warp :::::::
|
Find a good warp yarn in a neutral colour (that means the colour will not show up
too much). Try a thick knitting yarn or parcel sisal, nothing too soft or stretchy
or fluffy. Take your warp yarn and tie it to one of the two shoots near where it
came out of the thicker stem of the branch. Take it across the gap, to the other
shoot. Wind the warp round it three times. Then go across again, wind the warp round
the first shoot three times.
Continue going across the gap between the shoots of your branch, so that it looks
like a zig-zag line between the shoots. Do not put your warp threads too close -
this will make it easier to pass the weft.
To finish warping your branch, tie the warp thread to one of the wooden shoots.
|
|
::::::: The weft :::::::
is whatever you want,
for the first try use the same yarn as the warp.
|

|
But it can be yarn or string; or you can use 'natural objects' you find
in a garden or while out walking or in the cupboard. It must not be too
large or too heavy! You can use scraps of fabric, ribbon, paper, bark,
large clean feathers, bands you have cut from plastic, twigs or small branches,
fern leaves and flowers if you are allowed to pick them.
|
If your warp threads are wide apart you can weave with large weft items like long ferns,
fine branches, long-stemmed flowers, long bands of fabric etc. But a weft of yarn from a ball or
shuttle will be fine on this warp even if it's wide apart.
Use this decorative branch anywhere: in the garden, on the porch,
on the landing, in the hallway at home, in a room.
You can lean it against a wall or put it into a heavy vase, tub or large bottle
(to stop the container falling over you have to put weights inside around the base of the branch).
Get together with friends to make a forest of these for your group or school or youth center.
Make an exhibition of all the nature-looms and call it "the web-wood".
top of the page to choose
another loom or continue to read about the next loom
´l`_´l`_´l`_´l`
Number two Nature loom
´l`_´l`_´l`_´l`
This loom is more difficult, you might need help making it and weaving on it.
It is based on a very ancient loom, one which is thought to have been
the first real loom for weaving items to wear or have indoors.
It is a 'serious' loom because you could weave large things
like fabrics, rugs, curtains, chair covers, bed spreads on it.
You might need permission of the people who own the tree or branch you will
weave on.
That sounds mysterious ? Read on !
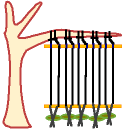
You need some thick yarn or thread for your warp (you will need very much more
than for the branch nature-loom!), a few long thin heavy stones which all have about the same weight,
some good thread for the weft, and some scissors to cut your threads. You will also need a pen,
two fairly straight thin branches without leaves, and someone to help you.
Look for a tree with a strong straight branch with not many leaves, growing as high as the top
of your head. Measure how much warp thread you need from the floor to the branch, ADD to this the
length of your arm from shoulder to fingertip. DON'T cut yet !!!
These two lengths are one single warp thread; on this point make a mark right round the thread with the pen.
Now double this length (looks like a "U"-shape). Cut your thread at the end of these two lengths.
You will have to put this on the branch exactly where you measured !
Fold your warp thread in half (half-way is where you made the pen mark). You get a loop.
Put this over the branch, at the spot where you measured the length, open the loop a little,
pull the ends of the warp yarn through the loop, pull tight. This gives two strands of warp
yarn hanging down. You did not 'tie' the warp to the branch but 'looped' it. This helps if
you need to adjust your warps later.
Prepare more lengths of warp yarn, put each one on the branch as soon as
you have cut it.
Put each double-warp-yarn not too close
to the one you looped on the branch earlier;
leave the width of a hand between each 'loop-knot'.
|

|
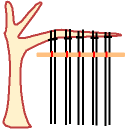
Now comes a tricky bit ...Hold a thin branch
somewhere near the loop-knots to make sure it is has almost the same length
as the branch with all your warp loop-knots.
Make a pen mark close to one end.
You have to mark the width of your hand the same as you did on the tree branch, measure
from that first mark, and make the marks all along the thin branch.
You should have as many marks as you have loop-knots of warp thread on the tree branch.
|
|
Next ...
You need to make a pen mark exactly between the two marks that show the
width of your hand. To help you see the new marks better make this new half-way mark
a really thick line. Do this all along the thin branch.
Then make the same
marks on the other thin branch you have.
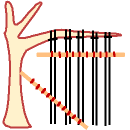
NOW ... hold one of these branches up to where
the loop-knots are. Start at one side, take the very first warp thread ( one from the
doubled-length you put on the branch) there, wind it round the first mark on the thin branch.
|
|
Make a half-knot. This will hold the thin branch under the loop-knot.
Do the same at the other end of the thin branch with the very last of all your warp threads
(you DID have the same number of knots as you had hand-width marks).
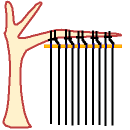
Now tie each warp thread, one after the other, around the thin branch, each
thread will go over a pen mark.
|
|
To weave you have to keep the warp threads stretched ---
but you can't really ask lots of friends to come and hold the ends of your warp
threads while you weave !
That's why you have the stones...
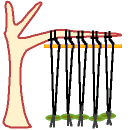
Hold 4 warp ends together, wind them round a stone and knot them tight.
|
|
When you have done all threads, "weave" the other thin branch between the
warp threads.
Remember ... over-under-over-under... you don't need to put the branch too
close to the stones. Make sure that all your warp threads are hanging straight;
no crossing-over or tangles, all these must be undone !
Now you slide each warp thread to where you have a pen mark. Look carefully,
the threads are next to each other and each has its own pen mark,
one next to the other.
|

|
This shows a ring of stone or of clay,
it is what the
people in the stone age used to weight the warps.
|

|
In my links about the history of weaving,
I have a site showing these on the loom,
it also shows that the weaving was done from top to bottom.
|
Now you can start weaving with your weft. Start below the top branch you tied into the warp.
You can use the same thread as your warp, or different thread; you can weave some rows with
yarn/ thread, and change to natural materials like unusual branches, twigs, ivy or fine roots
or other plants (get an adult to check the plants are safe), feathers etc.
If you weave with nature's materials you can use your woven work to decorate a wall. If you want
your work as a rug or throw-over cover etc., use yarns (and clean fleece if you can find it)
for the weft.
After every row push the weft up against the earlier weft. This is called "beating" the weft
(you remembered? good)
You have to start weaving AT THE TOP of this loom.
Weave slowly and gently. After 2 or 4 rows look at the thin branch at the bottom, if a warp thread
has moved, slide it back into place to its pen mark.
To take your work off the branch........:
you untie the stones and make a half-knot around the thin branch at the bottom, using each pair
of warp threads. If it is a wall decoration you tie each pair of warp threads into a firm knot over its
marker pen line on the thin branch.
If it is to be used you tie each pair into a half-knot, just so that the weft does not slide off the
warp when you move your fabric.
Then start taking the work off the top. Leave the first loop-knot, the last one and one in the center
of the branch. Cut the front of the second-from-edge loop-knot and tie this pair of warp threads
to the thin top branch. Do the same with all the loop-knots except those which need to stay in place
to hold your work on the branch-loom - until you are ready to cut those, too. Get help holding
the thin top branch when you want to cut these last two loop-knots because your work is quite heavy!
If your work is a fabric to use you have to take out the two thin branches, carefully. Then you tie
each pair of warp threads into a firm knot. This will give you an attractive fringe.
This work will be quite loosely woven because your warps are so far apart. A rug weaver would place the
warps much closer together (but he might have used the same distance when HE started to learn how to weave).
Maybe you feel confident and want to do another tree-loom project,
then you can try putting the warp threads closer together to see what difference this makes.
As I said at the top, this is a 'serious' loom, a real working loom. The weavers call it a
J
warp-weighted loom, and a few traditional craftspeople
use it to weave on it. You can sometimes see them weave on a tree, but usually they can be seen
at historical fairs and in museums.
You now understand why the loom has such a difficult name : the weights at the bottom of
the warps keep them pulled tight so that you can weave. You have just learned a very
technical word but you don't need to remember it - it's just nice to know what it means
if you hear the word somewhere !
top of page to choose another loom
or continue to read about the next loom
_-´´``-_-´´``-_-´´``-_-´´``-RecycLooms-´´``-_-´´``-_-´´``-_-´´``-_
things you won't throw away today !
These are ideas which many people have had, and which work. Even though they sound a bit
unusual.
::'::'::'::':: The BOX-LOOM ::'::'::'::'::
You need a sturdy carboard box, the type which has thick walls with 1 or 2 thicknesses
of ondulated card sandwiched between the smooth inner and outer layers.
Chose a clean box that's not damaged near the top or base. If there are 'flaps' for closing the
box, they have to be cut off. Make sure you see the open ondulations.
You need toothpicks or used matches, or even fine twigs the size to fit into larger ondulations
will be ok (don't leave them sticking out too far above the box top). And you need yarn
for warp and weft.
I have found boxes that had packets of rusks in them, so the box had thick walls, and it was
100cm x 50cm (40" x 20") large. The ondulations were narrow so I had to use the toothpicks.
I will describe how I prepared my box-loom. You may have other sizes of boxes, or the ondulations
might be different. This means you have to change certain things. As you are used to thinking
like a weaver when he encounters problems, you too will manage to adapt things so that you can work!
I wanted a mat for the table center so I decided the box was being warped up on the narrow sides.
I was going to weave a thick mat, using 2 threads of wool (I unravelled a damaged pullover) for
the weft and one thread of wool with one thread of embroidery cotton as my warp.
I started by pushing a toothpick 10cm in from the edge to allow the shuttle to pass easily.
I put a toothpick every 6 ondulations which gave me 15mm distance between toothpicks.
I did this on both narrow sides of the box.
I tied the warp thread to the first toothpick, and passed the warp across the box to the opposite
side, laying the warp thread round the first toothpick, and then coming back. It was quite a fine
long 'zig-zag' line of warp. At the end I tied the warp onto the last toothpick.
When I started weaving I realised
that my wooden
shuttle of 45cm / 17" length was too long,
so I made a card shuttle
from one of the flaps,
|

|
it was quite wide and much shorter, and worked well.
|
If you are looking for an instruction to make a large professional-looking tapestry
loom and a wonderfully easy reed, have a look at Vermiro's tapestry site.
You need some woodworking knowledge and tools, the result is a long-lasting quality item!
:´°°`:´°°`:´°°`:´°°`:´°°`:´°°`: Weaving Frames :´°°`:´°°`:´°°`:´°°`:´°°`:´°°`:
I have found a very good, clear explanation of how to make a frame loom. It is a little
complicated to make, you need to know something about wood-working, and the tools and materials
to make them. You might need some help to make them, or maybe this could
become a project for a craft group or in the school's woodwork department?! The frame loom can
last a long time, and could be made so small that it fits into a bag. You can weave some good
panels on it.
Go to this website and have a look :
Nigel's frame loom
:´°°`:´°°`:´°°`:´°°`:´°°`:´°°`:
Card looms
:´°°`:´°°`:´°°`:´°°`:´°°`:´°°`:´°°`:´°°`:´°°`:´°°`:´°°`:´°°`:
All my apologies ! This section is not finished as I have to write this page, re-do the looms and then take
photos. I thought I ought to mention that there will be more ideas so that you know what
to find here hopefully as from spring 2005. Some of the card looms will be fun for younger children to try.
Please call back again.
You have arrived at the end of this page.
You can go to the top of the page
to look at everything again.
To the weaver's shed

Or see ideas for things to make ?

|