-<>- Learn to WEAVE -<>-
<<< lesson ONE >>>
<>-<>- -<>- preparing the LOOM -<>- -<>-<>
-<->-< and "loom-speak" >-<->-
... all about those threads ...
Even before you start you need to learn a few important things:
& there are the special words
weavers use. Some people call them "terminology".
All weavers use this terminology of their craft: it describes certain things which are
not found elsewhere. It is almost like a language because people who don't know how to weave
won't know what the weavers talk about.
These words are important, it is best to learn them right at the start. On my site I use them,
but I will start by explaining what they mean to help you understand what I write.
J
There are a few things about weaving and fabrics for you to discover. These might be useful
to know and remember. They are not terribly important, and to know them won't make you weave wonderful
fabrics, but maybe some of this information can help you when you have a problem with your
weave. Also, you will feel proud when you understand things that other people don't know.
**~*~*~*~*~*~** and you have to learn that good preparation will
help you.
Before you start weaving, put everything you need close to where you will
be working, and you should have a comfortable chair and a table to work on.
You also need to learn how to prepare your loom and the yarn or threads you want to use.
Most people start on a flat "frame" loom. This will
help you get used to the movements, and you can see more easily what you are doing because you
can lift the frame and have a close look.
This is why I show you weaving on a "frame".
If you have bought a weaving frame, then you will see the things I am talking about. If you want to
make your own frame then see my page about making a loom (you find it in the weaver's shed
behind the drawing of a loom that looks home-made, on the table), then make a simple frame
to learn how to prepare a frame or a loom, and how to weave.
Now you start to learn some TERMINOLOGY&
Look at a table napkin, a kitchen towel or a handkerchief, you'll see that there are
threads going along one way and other threads going across. Look closely and you will see that
a thread is on the top and then it is hidden by a thread going across to cover it.
Believe me when I say that every thread you see, goes over every thread and then under every thread.
Your towel will teach you many things, and I will show more you in a minute!
J
Discovery 1 about weaving:
threads go over each other and under each other, and each thread does it. Each thread crosses each
next thread.
There is a pattern, a rythm, to this "over-and-under" crossing of the threads, but you will see
that later. This pattern of crossing the threads with each other helps to hold all the threads
in place. The weaver says that he "binds" the threads to each other.
&
This is the first special word you know ! To BIND the threads
with each other will make them stay together in a special pattern that the weaver has decided.
_�~�o`~`_
_�~�o`~`_
==¤==
==¤==
Is there anything to know about these threads?
Yes, but let us get there slowly, first we have another look at the hankie or towel or napkin.
Hold it by one corner,with the other hand take the next corner. See that some threads pass between
the top to the bottom and some threads go from side to side of the item? There are just two
directions in which the threads go.
J
Discovery 2: some threads in a woven fabric go between the top and
the base, other threads go from side to side.
These threads, when the weaver uses them in these two directions,
have special names. The weaver can do different kinds of work with them and needs to
know what he has done with which thread, and it is easier to remember things when they have a name.
Often he keeps a note of all the information about the colours, the thickness
of the yarn, how many threads he has used for the width of fabric he wanted, the pattern.
Take the towel to learn a bit more! Hold a short side up, a corner in each hand.
I think your towels are like mine: with a seam along the short sides. Someone has made
a hem to stop the threads opening up. That can happen when fabric is cut and then pulled about.
On a towel these sides were open because it was cut from a very
long roll of fabric that the weaver wove.
And to be able to weave all that length the weaver has weaving frames or looms longer than the
weaving frame you have for learning to weave.
To make a very long piece of fabric you need very long threads.
On a large weaving frame or weaving loom these very long threads are all put onto a roller or a
cross bar. This stops the threads from getting tangled up while they are waiting to be made into
fabric, the threads stay clean, they don't get pulled or break.
And there is a second roller or cross bar where all the fabric is put on, to stop it lying
on the floor or being pulled about because this would pull all the long threads.
The weaver would be unhappy with that because it makes weaving difficult, all the threads would
move, the fabric for your towel would not look good because the threads would not bind as the
weaver wants, the threads would rub against parts of the loom and could break, and everything
would get dirty very quickly. You see that holding the thread is quite important!
Before you learn more about this, you need some more terminology, it is difficult to keep
talking about "the very long threads"!
&
The weaver would not say "very long threads" ! He says that he is using very long
WARP threads.
When weavers talk together they don't often say
'long warp threads' but they talk about a long warp.
J
Discovery 3, discovery 4, discovery 5 :
... you have longer warp threads than you need for the item you want
(your towel was one of many towels cut from a long length of fabric);
... the warp and the finished fabric are put and kept on rollers
or crossbars.
... Stretching the warp between rollers or cross bars helps
the warp stay firm and secure when you weave.
And what about the threads that go along in the other direction, from side to side?
These threads have a special name, too.
Look at your towel again:
you see that the sides have no seam because the fabric there is different to the towel.
Usually it is thinner but you can't stretch it as much as the towel.
The weaver has done this on purpose, it gives a good solid edge to the towel so it won't pull apart.
And nobody needs to cut it to the right width because the weaver has woven his fabric just right.
J the special edges along the outsides of the fabric help
keep the edges and the fabric straight, and hold the fabric together
&
Here are two more words for your list of weavers' terminology:
the threads that go from side to side on the fabric, are called WEFT threads
the extra-solid woven edge on the fabric is called SELVEDGE
| You are advancing fast ...... Great ! |
|
Now you are ready to look at the weaving frame !!! |
In my drawings I show a flat frame because I find it easy to draw ...
and because you can use a frame or object like it, to prepare for weaving on it.
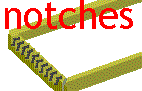
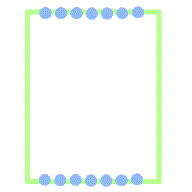
| your frame has pins or notches, along the 2 shorter sides |
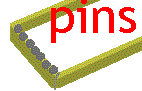 |
| tie the warp thread round the bottom left pin (or put into the first notch) |
| take it to the opposite side and put it round the first pin there to come back towards
you (or pass it along the outside edge of the wood and then put the warp
into the 2nd notch to come back towards you) |
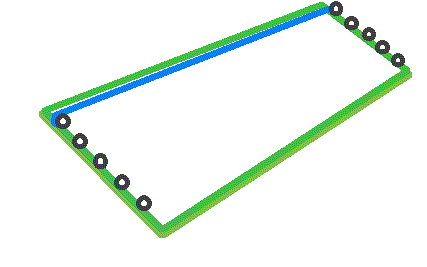 |
here you pull the thread around the 2nd pin (or pass through the 2nd notch, then along
the wood and put it into the 3rd notch) and go across towards the other side
I show
you a notch in the center of the loom, it is easier to see there what to do |
 |
keep on going up and back down, all along the pins or notches. It looks like
you are designing a zig-zag line when you do it.
This work is called "to warp up" or "to warp the loom".
because you are putting the warp on the loom or frame. |
| and here is an animation of WARPING UP ------- |
 |
|
You have warped up your loom
-~- -~- -~- -~- -~- -~- -~-
-~- -~- -~- -~--~- -~- prepare the weft -~- -~--~- -~- -~- -~-
Right at the top I said that there were other things to prepare. You need to have the weft ready
before you sit down to weave.
Things are easy if you have a small weaving frame, a frame where you don't have much space
between the warp and the edges or the base, or you have one of the cardboard 'fun looms' that I
show on the page about "Fun Weaves" (that is the circle on the wall in the weaver's shed).
To weave on these frames all you need is a thick embroidery needle so that you can get one or two
strands of your weft yarn through the eye. There are special weaving needles which are 7-10cm long
(3"-4"), but as long as your needle has a large eye and is not sharp at the point, any needle will
be fine.
But if you have a larger weaving frame, or one of the larger 'fun' frames? ... ? ... ?
I'm sure you have heard the word "shuttle" before, the Americans use space shuttles to explore space.
They have probably borrowed the word from the weavers, because
J
a shuttle is an item that goes 'there and back'.
This journey it does as often as the weaver needs it.
& In weaving the shuttle is the item that carries the
weft thread from one side of the fabric to the other. And then back again.
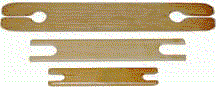
To carry the weft you have to put the weft on the shuttle. Have a look at the photo: there is a
notch in each end : this is where you put the weft. You pass your weft in each notch, winding it on
until the threads start slipping to the side.
there are different sorts of shuttles.
The one you use depends on what you are weaving.
To begin weaving on a frame you will find a flat shuttle best. |
 |
Be careful, don't put too much on because you will have problems passing a fat shuttle through the
warp threads.
??????
What did I say there
??? ???
...... to understand what I mean go to the next lesson !
|