-<>- Learn to weave -<>-
< < < lesson FIVE > > >
-<>-<>-<>-
how to weave a little faster... -<>-<>-<>-
Part One : leash stick and shed stick
-<>-<>-<>---<>-<>-<>---<>-<>-<>---<>-<>-<>-
If you have decided that weaving will be a really good skill to have, you like making things that are
attractive and unusual and cannot be bought for any money, and you know it is a great activity for your leisure time,
then I'll show you how to speed up weaving the linnenweave.
You remember: over one warp thread, under the next... and to make sure that the last row does not get
taken out you watch that you continue this pattern when you start the new row.
I'll write it - | - | - | - | - | - | - | over under over under over..........
down for you | - | - | - | - | - | - | - under over under over under ...........
- | - | - | - | - | - | - | over under over under over ..........
Have you thought about what you do here? In every row you lift every second warp thread up and leave the others
lying flat stretched between the two rollers or beams. You lift every tread with a finger when you want to pass the shuttle
underneath it. Sometimes this can make you feel tired very quickly, and you start taking less care and weave errors into your fabric..
But there is help to speed things up
so you won't get quite so tired!
you have done this since the start of your lessons: for each passage of the shuttle
you lift the warp thread as I have explained.
This is rather slow, but you must learn this method because
you need to know it if you want to weave pictures and decorations later! |
 |
 |
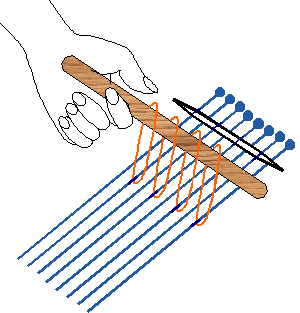
a leash stick lifts ALL the second warp threads at the same time |
| there are loops made from rather solid, fine, smooth and non-stretchy thread on the leash stick,
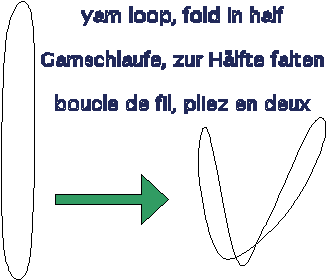
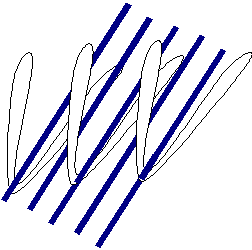
half as many as you have warp threads on the loom. Each loop is folded like a "U" and in the fold will lie a warp thread...
|
 | |

 |
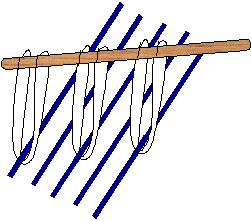
each second warp thread lies in the fold of its own thread-loop. The ends of the thread-loop are
slipped onto the leash stick.
The thread-loops all have to have the same length: to lift the warp threads up to
the same height. This will make it easy to pass the shuttle underneath, and it will avoid you breaking
warp threads which you pull too much while others are still hanging close to those you don't want to pull upwards.
|
So: you can lift all the 'second' warp threads up without too much effort

to pass the shuttle underneath!!!
I'm sure you see that it is a really good idea to lift all the warp thread at the same time, and you want to
know if you can do the same for the other warp threads which are not attatched to the leash stick.
You could save so much time. Yes, a system exists that allows weavers to lift the other warp threads up just as easily.
But your weaving teacher, in this lesson, will show you the traditional hand weaver's method. You use a shed stick.
A shed stick is a stick that opens the shed. It stays close to the warp beam, in between the warp threads.
I have drawn the even-numbered warp threads tied up to the leash stick.
And I show that the shed stick passes under all those warp threads which have an unveven number (if you were to number all the warp
threads on your loom).
On my drawing you see that the shuttle passes under the warp threads with an even number and over those
with an uneven number. You have a very good distance between these two sets of warp threads (those you lift up
with the help of the leashes on the leash stick, and those which stay flat). Now the shuttle can pass
through the warp threads from one side to the other, without tearing any warp and without rubbing the weft
on the warp.
When you have passed the shuttle through, you place the leash stick towards the back on top of all the warp,
and beat your woven row down.
In my drawing I want to show you what this looks like: I have placed the leash stick lying on the rows already woven.
You can imagine that the shed stick will lift up all the uneven-numbered warp threads which are not tied to the leash stick.

See that the leash stick lifts up the warp threads? This gives you a large distance to the other
warp threads. This distance is called the SHED. You push your shuttle through this shed.
When you drop the leash stick down you close the shed; then lift up the shed stick to get a new shed.
|
Look again at the animation.Can you see the error??? You are right: you must never
pull the leash stick towards the woven rows, and leave it lying there, if you want to continue weaving!
Well spotted! Because: if you then lift up the shed stick and pass the shuttle through, and beat that row down,
you will have trapped the leashes in the weave. You won't be able to lift the warp thread to make a new shed.
You can only weave in front of the leashes and the shed stick. That is where you get your shed for the shuttle.
|
Here I have a few more words for your list, and discoveriess:
& to lift all the warp threads at the same time you need
either
LEASHES made from non-stretch smooth yarn all in the same length and slipped onto the
LEASH STICK
Or : you lift warp threads with a SHED STICK
& Because some warp threads are lifted up and others stay down,
there is a distance between the two heights. This is called
the SHED and you push the shuttle through it.
J You weave in front of the leashes and the
shed stick, by the side where the woven rows are.
|
![]()
![]()